This is a moderately advanced topic, but even so, one that I consider that those starting out with Piezography should consider. It’s about which version of Piezography to use – K7 or Piezography 2 (which is really just K6 with both MK and PK always available). Although it’s advanced, I think that it’s an important issue, as it affects which inks new users buy and put in the cartridges. This is even more so for an ink-lines-and-dampers printer like the R3000 or larger, where changing inks later is a tedious and expensive process.
If you want a quick answer, it’s to use Piezography 2 and don’t worry about K7. (But if you want to use P2 on an R1900 or R2000, you’ll need to grab some remapped “curves” – the download link is below, near the bottom of this article). I started with K6, moved to K7 and recently have moved back to P2/K6. But first, a personal rant about minimising wastage when printing. If you want to get to the basic information quickly, then skip head to P2 As A Solution or the Recommendation.
A Personal Rant
Once upon a time I was printing using an Epson 2100/2200 (K2 inks), printing colour images on gloss using Qimage and the standard Epson driver, and printing B&W on matte using QuadToneRIP (QTR). However if you swap between matte and gloss often enough then you quickly get sick of the mandatory head-clean as part of the MK/PK swap, especially at Epson small cartridge prices.
So I thought that having a dedicated B&W matte printer was the way to go. I researched B&W inksets and opted for Piezography over the much cheaper Paul Roark Eboni inksets, because of the reputation at that time of the latter for clogging.
This was at about the time that the R1400/R1410 came out and Jon Cone was talking up its 1.5pl drop size. It was an inexpensive introduction, so I had the 2100 for colour gloss and the R1410 for B&W matte. This worked well. In a moment of rashness, a few years later I upgraded to the R1900, partly to get K7 rather than K6 (more on this below), but as I recall, at the time Piezography was still all-matte. It still worked well.
Fast forward a couple more years and and it was then possible to do gloss Piezography, but you had to swap the MK & PK cartridges on the desktop printers (not so on printers with switchable blacks, but there’s another story about that – read on). Fortunately by the time I got around to taking up gloss Piezography, it was known that Warm Neutral shade 1 (WN1) didn’t lose any dmax on matte, so it could be used as a universal black for both matte and gloss. I was in the happy position of still being able to have both a colour and B&W printer, do B&W on both gloss and matte, and still not have to do the dreaded MK/PK swap.
However in more recent times, WN1 has been reformulated and no longer seems to perform as well on matte any more. So I was staring at the dreaded MK/PK swap if I wanted to print Piezography on both gloss and matte.
There’s an irony here. I took up Piezography precisely in order to avoid flushing ink down the waste tube at every ink change. If I was prepared to do that then I probably wouldn’t be here writing about Piezography. While Jon Cone has said that this is part and parcel of printing and using the system as intended, I have an aversion to unnecessary waste. I really don’t like flushing ink down the tubes. Yes, if we’re going to print then we’re going to have to consume ink and paper and carts – you can’t make the proverbial omelette without breaking the proverbial eggs. And not all of it is going to be productive – there are drafts, proofs, linearisation plots, unavoidable head cleans, etc. But I really object to the MP/PK swap waste.
All my piezo printers have been carts-on-head printers. The same MK/PK swap issue also applies to the ink-lines-and-dampers printers, like the 3880. If anything they’re worse, because of the required maintenance (see my comments about printers and maintenance). You need to do the MK/PK swap every two weeks to keep the ink flowing, and that’s 6ml for the round-trip each time, and over 12 weeks that’s 36 ml of ink and in six months you’d have flushed an entire cart’s worth of ink down the tubes. Seriously? Read about the ordeal of one user who didn’t do this sufficiently regularly, or in more detail here.
P2 As A Solution
Why am I engaging in this rant? Because there is a solution already available, but in my view it’s not promoted sufficiently by InkJetMall. The good news to those who wish to avoid the waste associated with the MK/PK swap is that the solution is Piezography 2 or P2. This is really just K6, i.e. shades 1-6 are used and shade 7 from K7 is omitted. In a printer with eight channels, six slots are taken up with shades 1-6 including the matte shade 1, the seventh with the other shade 1 for gloss, and the eighth with the Gloss Overcoat (GO). So both blacks are always available and there’s no swap.
So, what are we missing by leaving out shade 7 in order to have both blacks installed? In my view, not much, if anything. I never saw a benefit from switching from K6 to K7 in any of my prints, and to be honest I initially felt like I had wasted my money when I upgraded to the R1900. I don’t really feel that way now, as it has a much better build than the R14x0 series and the eighth channel enables the option of printing on gloss. But I have always regarded shade 7 as an unnecessary extravagance. Perhaps those printing a lot of high-key images in large sizes might benefit, but I have looked at a few high-key images that were printed on both, and I couldn’t see it. Jon Cone of course defends the K7 system “we think its best to run Piezography at the highest available amount of black inks“.
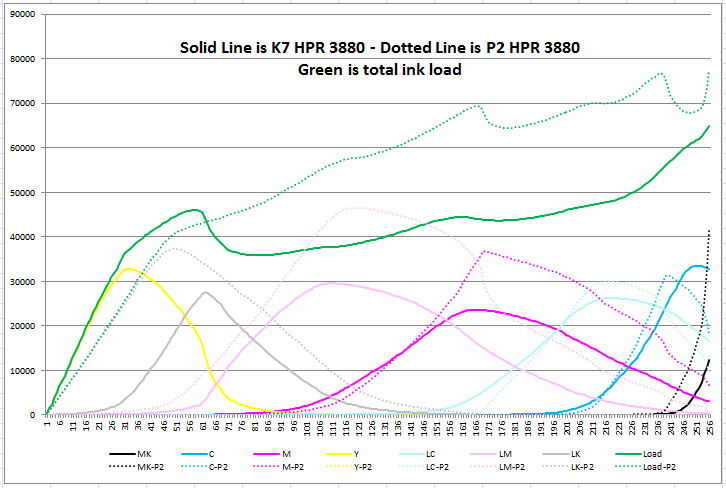
Here’s a comparison of the P2 and K7 curve for HPR on the 3880, with the colours indicating the placement of the ink shades in the printer:
The R1900/R2000 and Wider Promotion of P2
There’s a catch. Or so I thought. When I first started using Piezography for gloss printing I was aware of P2, but the InkJetMall support page says: “Piezography 2 is NOT available for non-K3 models, including the 1400/1430, 2200, R1800/R800, R1900, R2000, or 7600/9600“. This was always a great disappointment, especially given my doubts about shade 7. Note: This statement doesn’t appear on the InkJetMall or Piezography websites any more, but certain printers are still not listed as P2-supported, so what follows is still relevant for some printers.
Now I can’t speak for all the other printer models, but I have discovered that in fact this is not true for the R1900 and therefore not for the R2000 or P400 either. These hi-gloss inkset printers are not K3, but they are in fact heavily disguised K3 printers. They use the same DX5 printhead as the R2880, from what I can gather, and some of the larger and older K3 printers also use some sort of DX5. The R1900 is virtually identical to the R2880 physically, so it was surprising to me that P2 doesn’t suit the R1900/R2000.
It is true that the Piezography QTR “curves” (.quad files) are different for the R1900 – the ink shades are listed in a different order. So as an experiment I remapped the standard P2 SE x880 curves so that the shades in the quad files appeared in the correct order for the R1900, and then checked how linear the result was by printing out a standard 21×4 test chart and measuring it. Here is the result for Hahnemuhle Photo Rag (HPR). The objective is to have the black line with measurements of the luminosity of 21 evenly spaced patches, ranging from black to white, track the “ideal” pink line fairly closely:

If you’ve not seen one of these plots before, this is pretty darn good. I have to say that I was both staggered and greatly relieved! This is better than the standard HPR R1900 curve performs on my 4½ year old R1900, which has a certain amount of drift. Roy Harrington’s new droplet for relinearising quad files ironed out the small bumps and pulled it into a straight line (see my separate article on how to do this).
So P2 is available for the R1900, once the x880 curves are remapped for it. I’ve remapped all the eleven available x880 Special Edition P2 curves to the R1900/R2000, and for those papers that I am in a position to print on, the results are similar, although not quite as good as HPR above. I’ve also used the HPR curve as a proxy curve for EEM, and HPR-Baryta for IGFS, and again got excellent results. I’ve also remapped all the eleven x880 P2 curves for Neutral to the R1900/R2000. You can download the package with both sets here. If you’re using another inkset, I have published my spreadsheet for doing the remapping on the IJM support site.
There is another side benefit to this discovery. One problem with the R1900/R2000 is that the range of available K7 curves is more limited than for the x880 printers, if you still want to use K7 rather than P2. IJM has been reluctant to create more, as the work wouldn’t be justified for such a niche printer. But this isn’t a problem it seems – the x880 K7 curves can be remapped to the R1900 the same way, using the same spreadsheet tool. Problem solved.
Recommendation
This long journey of discovery may read to some like P2 is only an option for the R1900 and R2000. Not so. You can use it in any supported Epson printer with eight or more cartridge positions, so this covers all the K3 printers, and in the R1900, R2000 and P400 if you use the remapped curves.
For printers without switchable blacks (e.g. the R2880, 4000), it means you won’t have to switch shade 1 cartridges when you switch from matte to gloss or back again.
For printers with switchable blacks (R3000, 3800/3880, 7890/9890 or 7900/9900), you won’t need to switch blacks ever again. You put shade 1 gloss in the yellow slot and flush in the PK slot. However, for these printers, you will need to construct your own remapped curves, so that shade 1 for gloss is sourced from yellow and not the black position. The spreadsheet I posted on the IJM site will show you how it’s done.
Inkset-Specific Curves
There is one interesting feature of P2, and that is that whereas K7 has curves that are meant to be used for all five Piezography inksets, there are sets of P2 curves specific to each of the inksets. In an email Jon told me that “With K7 we could easily go across ink sets [with a single curve]. But with P2 we will release [curves] based on each ink set“. Interesting.
| Last: Printer and Inkset Selection | Next: Measurement and Viewing |
What is the difference between Selenium Shade 1 photo black and Warm Neutral Shade 1 photo black and why would I choose between one or the other?
Sorry about the delay in replying, but your comment went into the spam folder. I think that this recent post by Walker is probably the best answer. I also think that despite its name, Selenium shade 1 was neutral, whereas WN shade 1 was ever so slightly warm, but the slight difference in toning was something that most people wouldn’t notice in practice.
There is also the new Piezography Pro ink set which uses either a double quad or double quint ink set which is blended in software giving you seven or nine shades of ink depending upon printer mode