You’ve come to this page because you’re going to print out colour profiling targets and send them to me so that I can scan them and send you a colour profile for your printer / paper / ink combination. It is critically important that you print the targets the right way, and this has become harder in recent years, as you can no longer use Photoshop to do it (see below).
Imagescience also offer a commercial profiling service, and so have their own set of instructions. Mine follows theirs fairly closely, although note that you must use the targets I provide below, rather than the ImageScience ones.
A One-page Profile or Two?
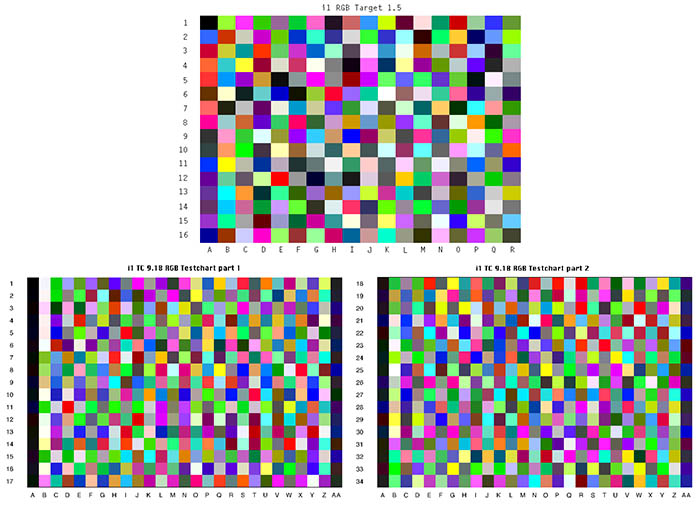
First you need to decide whether to print out a single page with 288 patches or two pages with 918 patches. You get good profiles either way. In theory the two-page option should deliver a more accurate profile, and some people advocate far more pages and patches. However I’ve printed and compared a printing demonstration image using profiles created both ways, and the difference was hard if not impossible to see. It’s up to you. I’ve included files for both in the download. “i1 RGB 1.5.tif” is the one page target and “TC9.18 RGB i1 1_2.tif” & “TC9.18 RGB i1 2_2.tif” are the two page targets.
Download the targets to print.
What Software to Print With?
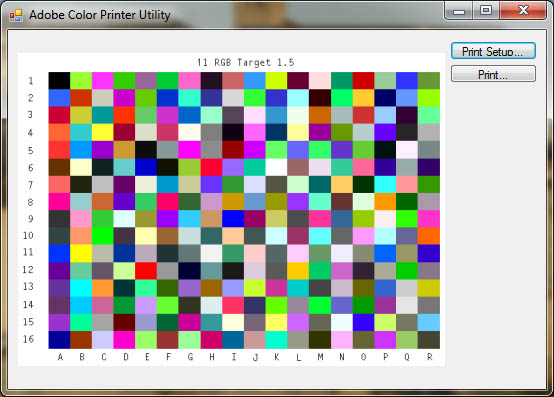
First of all, don’t use Photoshop, unless it’s CS4 or earlier. You can’t print with “no colour management” since CS5. The Imagescience instructions say to use the Adobe Color Print Utility, and that is the simplest and safest option. It’s pretty basic, and on Windows at least the margins option (from the “Print Setup …” button) doesn’t work, so the target is not centred on the page. This is a nuisance, but not an obstacle.
There are other specialist printing programs that can print without colour management. On Windows you could use Qimage with no colour management, and on Mac OS X you can use Print Tool with no colour management. You can also use i1Profiler, but that’s a rather complex approach. If in doubt, use ACPU.
Printer Configuration
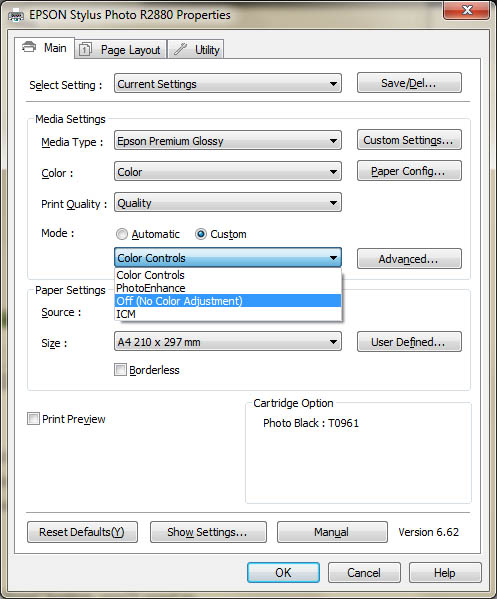
This is the tricky bit. If you’re using ACPU, hit the “Print Setup …” button and select A4 (or Letter). Then hit the “Print” button, you’ll need to select your printer and then you must select “Properties” and set some options. (i) Choose the best matching paper type from the available options for the paper you are having profiled. (ii) Configure the print quality to be exactly as you propose to print. I think 1440 is fine for most work, although opinion obviously varies. High speed off is probably best here. Here is a screen grab of this setting for a recent model Epson Printer:
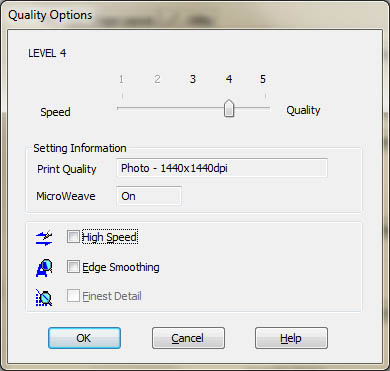
(iii) Even more important than this is to turn colour management (ICM) completely off. It is important to ensure that the targets are printed exactly as-is without any manipulation by the printer driver. Again, another screen grab:
As this is also how you would print images using your newly created ICC profile, it’s advisable to save a setting (top of the dialog) containing these options.
Finally
Print. Let the page(s) dry for 24 hours. Post or deliver to me, in a way that protects the print surface.