A Secret
QuadToneRIP (QTR) has a dirty little secret, although it’s most definitely not the fault of its author. On Epson non-Pro printers (R3000, P600 or smaller), micro-banding occurs in the first and last inch of the page, in terms of the direction it is fed into the printer, i.e. not on the sides. This is what it looks like, with the red line indicating one inch from the start of the page:
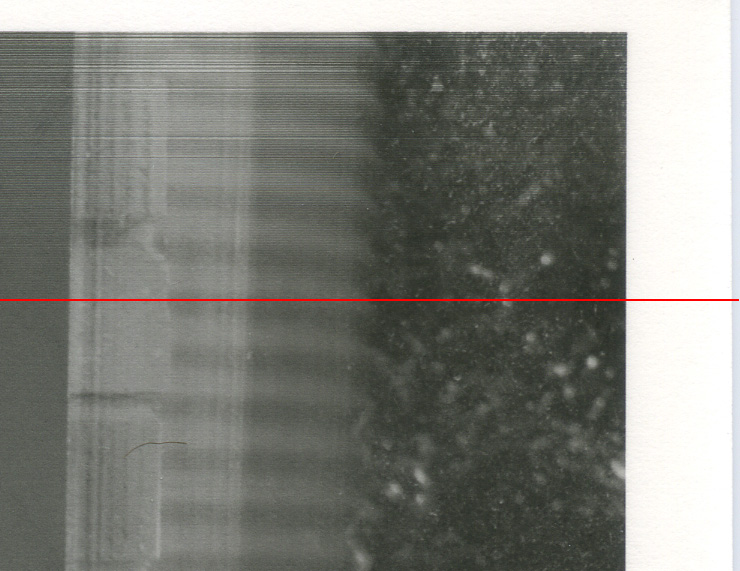
It might seem like it’s confined to the first 15mm or so, but if you were to look at the print carefully, it’s there most of the way to the red line. In my article on printer selection, I raised this as one issue to consider when deciding between a Pro and non-Pro Epson printer.
Micro-banding is not always easy to see, although sometimes it is, but it is almost always there in prints from desktop printers. It doesn’t seem to happen with the R1400, which makes it an exception among desktop printers. I can’t see it in prints from my old R1410 (same as R1400 but branded differently in some countries), and for this reason I really wish I had kept that printer. The micro-banding came as a shock when I upgraded to an R1900. As the R1900 image above shows, it’s pretty clear on other desktop printers, including the R1430. How visible it is will depend on the image. And this doesn’t just apply to Piezography, it applies to printing with any inkset using QTR, such as Epson K3 inks and Eboni6.
Why? In summary, special secret, proprietary Epson algorithms are needed to print in the first and last inch of the page on these printers. These algorithms control holding on to the page and advancing it while printing when the page is not held by both rollers, i.e. at the beginning and end of a print. For the Pro (3880 and above) printers, this code is built into the firmware of the printer, and so any software that drives the printer automatically has access to the code. However for smaller Stylus Photo printers (R3000, P600 and below), the code is in the driver, and so only software that prints via the Epson driver can access it. This does not include QTR. Hence you get micro-banding on the first and last inch. How much will depend on the image. This post from Roy Harrington is a succinct summary.
The Lead Sheet as a Workaround
There are two solutions, other than buying a Pro printer:
- Use larger (1″) leading and trailing margins.
- Use some low-tack painters masking tape to tape on a “lead sheet”. This requires you to define custom page sizes and position the image carefully, but it works a treat for me.
I use option #2 for A4 printing. I use a 140mm long lead sheet (210mm wide). I create a custom page size which is 297+140+140 = 577mm long, but don’t actually attach the trailing 140mm sheet (see next para). Custom page sizes are easy on a Mac, or so I’m told. On Windows, QTRGui only allows one custom page size, so to make it easy to switch between multiple custom page sizes I hacked QTR’s PPD file for the printer to add more custom page sizes. To print on this page I simply centre the image, although you could set margins manually if you like, taking account of the 140mm lead. The lead sheet probably needs to be white on the leading edge, i.e. the edge has not been previously printed on.
You should also need a trailing sheet to avoid micro-banding in the last inch, but I don’t actually attach the trailing sheet, because they become detached and jam too easily. Despite this, I don’t get banding in the last inch. Simply specifying a trailing strip but not attaching one is enough to fool either QTR or the printer firmware into printing normally. Why this works puzzles me, but it does. I’m not complaining. And yes, I’ve checked with a loupe.
I haven’t often used a lead sheet on larger paper sizes like 13″x19″. When I print that large, I usually use a 1″ margin for framing, so it’s not a problem. But on an A4 page, which I print on a lot, a 1″ margin for a 2:3 aspect ratio image only uses 63% of the page, and the image is just too small with too large a 1″ margin IHMO. I’m currently printing with a 7.5mm margin.
Yes, attaching a lead sheet is a bit of a nuisance! But I find my lead sheet approach less of a nuisance than 1″ margins, or keeping a 3880 or larger Pro printer working well without any ink sedimentation in the carts, ink lines and dampers. While it’s true that sometimes micro-banding is not readily visible – it can vary a lot – I am more interested in avoiding it completely than burning ink and paper trying to work out when you can see it and when you can’t.
Points to Watch
A couple of points to watch.
- Use a good quality low-tack painter’s masking tape. This is less critical for gloss, as getting tape of the back of gloss is not hard, but it’s critical for most matte papers, if you want to avoid tearing the paper. The good low-tack tapes come off pretty easily if you’re careful. I use this: Bear 24mm x 50m Low Tack Delicate Masking Tape (this listing is different to what I originally bought – but I think it’s much the same) and I guess something similar is available in most countries.
- Don’t skimp on the tape. You’ll need it most of the way across the join. If you just use a short section at either end, there’s a good chance that sooner or later the middle of the join will separate slightly and some of the paper feeding mechanism will catch on the gap and the paper will get stuck in there and perhaps the lead sheet will come off. This is bad, but it’s easy to avoid simply by using enough tape most of the width of the paper. Tape is cheap. Good paper is not.
- Don’t use too short a lead sheet. Strictly you only need 1″, but short lead sheets are harder to extract if they do separate. I think 140mm is fine for the sheet feeder, but if I was using the manual rear feed on any of these printers, then I think I’d use a full page. I.e. an A4 page taped to an A4 page and a custom page length of 297 + 297 + 297 mm. The rear feed may seem gentle, since there’s no paper feed roller, but I’ve found it to be a long and complex path, and a very long lead sheet seems the safest approach.
Gloss Printing
This idea of printing with a lead sheet was originally suggested by InkJetMall for gloss Piezography printing. When printing on gloss, you need to print the image, let it dry and then print the gloss optimiser or overcoat (GO) in a second pass. There is a risk that the paper feed roller will mark and ruin the print when feeding the paper for the second pass and you’ll get problems like this (although unfortunately the images that show the effect got lost in a forum software upgrade). Hence the need for a lead sheet, that takes the impact from the paper feed roller and protects the print. Either that or a very long 2″-3″ (50mm-75mm) leading margin.
There is another option for the GO second pass. If your printer has a rear or front manual sheet feeder (most have at least one of them), and it will accept the paper in question (these manual feeds can be finicky), then you can simply use the manual feed for the GO second pass, with no lead sheet. There’s no paper feed roller to mark the print. This is not a solution for micro-banding though. Without a lead sheet you will still get it in the print during the first pass, even when using the manual sheet feed.
So, my approach is the inverse of what IJM recommend. I print the image with a lead sheet using the regular sheet feeder, and for gloss, I print the GO in a second pass without a lead sheet by using the manual sheet feed. Works well for me.
Amount of Gloss Optimiser (GO)
The amount of GO that should be used varies with the paper type and other factors. Normally 30,000 units is the starting point. Jon Cone has provided some indicative amounts for common papers here and here, which are probably better starting points.
| Last: Measurement and Viewing | Next: Resizing and Resampling |
Thank you very much Brian,
I just started using Quadtone and could not get around this issue, with any adjustments. I have the Epson P600.
Your summary is very clear and the makes sense. Much appreciated.
I am still getting banding in the shadows, so I think that Quadtone is not for me. Will reduce my learning curve to the simpler ABW use and more profiling.
You’re welcome David. I’m glad you found it useful. Outside of the 1″ areas, you shouldn’t have banding. Do you have a good nozzle check? What paper are you printing on? What resolution are you printing at? You should be printing at 2880, anything less will probably lead to banding. I think the P600 has 2880 super mode in QTR, and you might try that. I prefer QTR prints to ABW. The lead sheet workaround is a little tedious, but only a little and once it’s part of your workflow you don’t really notice the minor inconvenience.